
There are a few reasons why I am not going to be the mother of the year. Here are a couple of reasons, for those of you that don't look at our Facebook page:


So I attempted it, but I didn't use any of the cake recipes that I Am Baker used. I used Bakerella's red velvet cake, Martha Stewart's white cake, and Bakerella's cream cheese frosting. I have to be careful what recipes I choose because my oven is due for replacement and it doesn't let me cook anything that is a bit delicate.
So here is how they were made (I'm a lover of "point form", I hope that suits everyone):
Bakerella's red velvet cake:
2 1/2 cups all purpose flour
2 cups sugar
1 Tablespoon cocoa
1 teaspoon salt
1 teaspoon baking soda
2 eggs
1 1/2 cups oil
1 cup buttermilk
1 tablespoon vinegar
1 teaspoon vanilla
50ml red food coloring
- Preheat oven to 180 degrees.
- Grease and flour two 8 inch cake pans.
- Lightly stir eggs in a medium bowl with a wire whisk. Add remaining liquid ingredients and stir together with whisk until blended. Set aside.
- Place all the dry ingredients in your mixing bowl and stir together well with another wire whisk.
- Add wet ingredients to the dry ingredients and mix on medium-high for about a minute or until completely combined.
- Pour into cake pans and then drop the pans on the counter a few times to release any air bubbles.
- Bake for about 30 minutes or until a toothpick inserted comes out clean.
8 ounces plus 2 tablespoons unsalted butter, room temperature, plus more for pans
4 1/2 cups plain flour, plus more for pans
1 1/2 cups whole milk
9 large egg whites, lightly beaten
1 tablespoon pure vanilla extract
1/2 teaspoon almond extract
2 tablespoons baking powder
1 1/2 teaspoons salt
2 1/4 cups sugar
- Preheat oven to 180 degrees. Butter and flour two 8 inch round cake pans, tapping out excess flour; set aside.
- In a medium bowl, stir together, milk, egg whites, and extracts. Into a second medium bowl, sift together the flour, baking powder, and salt; set aside.
- In the bowl of an electric mixer fitted with the paddle attachment, beat the butter on medium speed for 30 seconds. With machine running, gradually add the sugar. Continue beating until light and fluffy, about 2 minutes. Scrape down sides of bowl as necessary.
- Add one-third of the flour mixture and one-third of the milk mixture, and beat on low speed until just incorporated. Add remaining flour and milk mixtures in 2 separate batches beating between additions to fully incorporate. Scrape down sides of bowl, and stir by hand to finish.
- Divide batter evenly between prepared pans. Smooth surface with a rubber spatula. Bake until top of cake springs back when lightly pressed and a cake tester inserted in the center comes out clean, 25 to 30 minutes.
- Bake two 8 inch red velvet cakes.
- Within 5 minutes of removing the cakes from the oven cut the crusty tops off them and put the two cakes together, with the cut sides against each other. Wrap them in glad wrap and put them in the freezer for at least 5 hours.
- Bake two 8 inch vanilla cakes, and repeat the cutting and wrapping process.
- Cut out an 8 inch round piece of cardboard and draw three circles inside:
 |
| I used a compass to space the circles evenly 1 inch apart, but it doesn't matter if they're a bit wonky. |
- Use the circles as a guide and cut rings out of the cakes:
 |
 |
| Be mindful of how straight your knife is when you're doing this. |

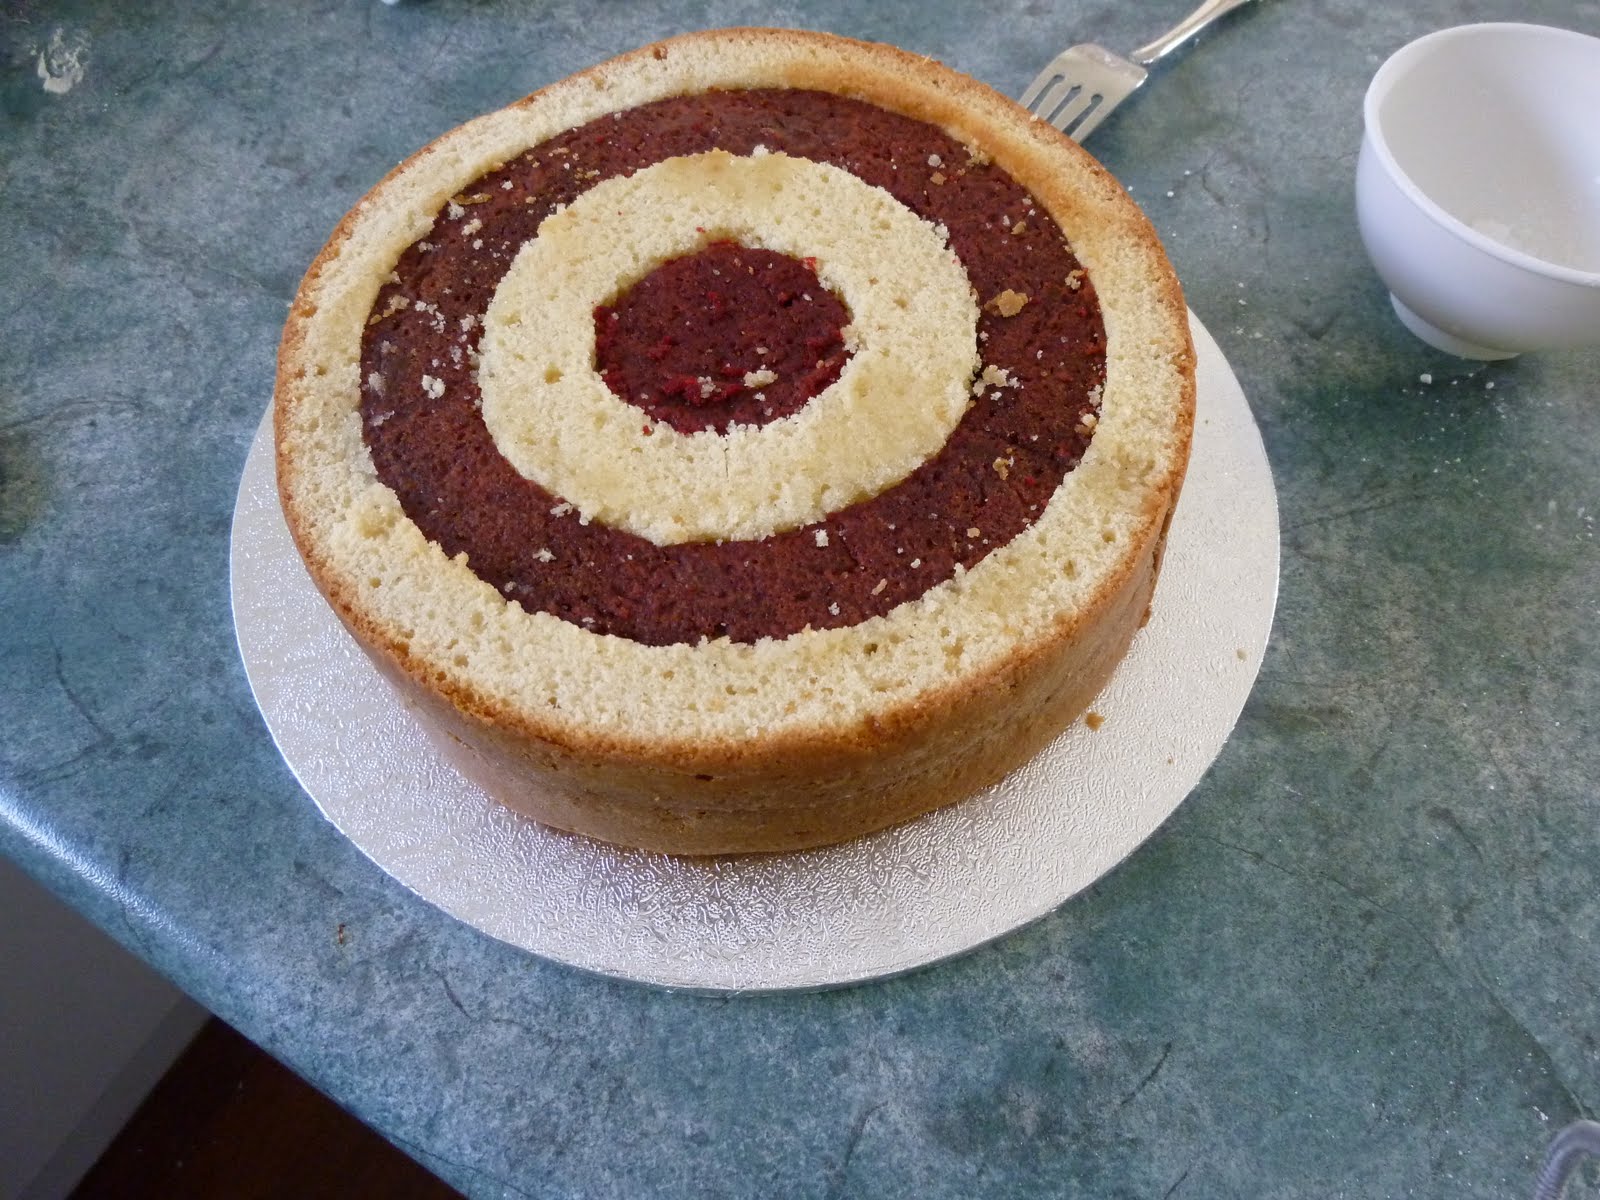
- Assemble the layers like this:
- Drizzle a little simple syrup over the cakes to help bind them.
- Re wrap them in glad wrap and tie a tea towel around them to help bind them:

- Put them back in the freezer for at least an hour to make sure they stick together properly.
- Remove from the freezer at least a couple of hours before you plan to decorate them. You don't want to ice a frozen cake.
8 oz. cream cheese, room temperature
1 cup butter, room temperature
1 teaspoon vanilla
6 cups icing sugar
- Sift sugar and set aside.
- Beat cream cheese and butter on high until creamy. Add vanilla.
- Then, add the sugar in batches. Scrape down the sides in between each addition.
- I added a little cream to the mixture as it was a bit too stiff to pipe. See how you go.
Now, you can decorate these cakes however you like, here is what I did:
For the first cake I copied I Am Baker's technique of covering the cake in rosettes. To do this I covered the cake in a crumb coat of frosting and popped it in the fridge for 10 minutes.
 |
| Very messy crumb coat. Who cares!? |
Then using a piping bag with an M1 tip I covered the cake in rosettes, just like one would do to a cupcake.


 |
| Fill in the gaps with extra lines of piping, in the same direction as your rosettes. |


For the second cake I just covered it with cream cheese frosting and placed some hand made sugar roses around the edges:


Enjoy! Katy.xx
No comments:
Post a Comment